


13.06.2008 12:52
Normalmap creation with Photoshop and Nvidia plugin -
- (3/10)
|
|
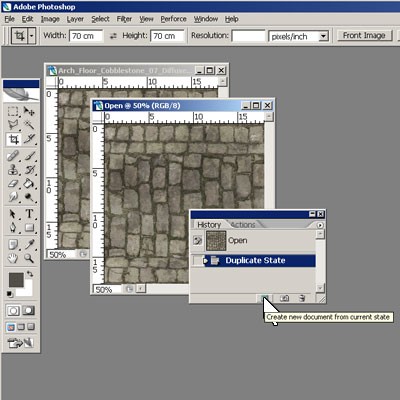
| Workflow Part 1: - duplicate your diffuse textur one time with create new document from history" in history. (fig1) - apply the nividia filter to one of the copys for getting a detail structure normalmap. Setting: Scale=4, Alternate Conversion=Max(RGB) (fig2) (the y normal was inverted, because our game engine needs this) - put the normalmap aside for later compositing. (Tex1) - get the other copy and desaturate (strg+shift+u) - apply Gaussian Blur Filter with small Radius (2-3 pix) (fig3) - duplicate your diffuse textur one time with create new document from history" in history. - apply the nividia filter, set Scale " to 15 - put the normalmap also aside for later compositing. (Tex2) - get the other copy - apply Gaussian Blur Filter with higher radius (4-5pix) - duplicate this document one time with create new document from history" in history. - apply the nividia filter, set Scale " to 25 - apply Gaussian Blur Filter with small Radius (1-1,5 pix) to your normalmap in order to reduce moiré-effects, that came by using the gaussian-blur with high radius. (fig4) - put the normalmap also aside for later compositing. (Tex3) |
|
| Предыдущая | Следующая |
| На главную страницу галереи | |